“map”은 공간을 연상시키는 의미로, 피처 맵은 피처가 공간적으로 어디에 있는지 알려준다.
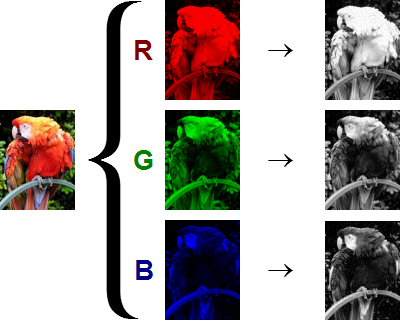
RGB 이미지는 피처 맵이 쌓인 것이다.
세 개의 피처 맵으로 구성됩니다.
첫 번째는 '빨간색' 피처가 있는 위치, 두 번째는 '녹색', 세 번째는 '파란색'을 알려준다.
채널 수가 N개인 스택 특징 맵에 컨볼루션 레이어를 적용하면 채널 수가 N개인 스택 특징 맵을 다시 얻게 된다.
이러한 출력도 피처 맵의 스택이므로 다른 컨볼루션 레이어에 완벽히 허용되는 입력이 된다.
즉, 일반 선형 레이어를 함께 구성한 것처럼 컨볼루션 레이어를 함께 구성할 수 있다.
다시 선형 컨볼루션 사이에 비선형 함수를 엮어 컨볼루션 신경망, 즉 CNN을 생성한다.
Convolutional neural networks build up visual understanding layer by layer.
Q1. 이 피처 맵의 채널에 표시된 빨간색/녹색/파란색 레이블은 무엇을 의미하는가?
Q2. 네트워크의 15번째 계층의 32번째 채널에서 특정 위치의 활성화가 높다는 것은 무엇을 의미하는가?
자동으로 답을 알아낼 수 있는 보장된 방법은 없으며, 사람이 해석할 수 있는 결과라는 보장도 없다.
OpenAI의 Clarity 팀은 수년 동안 사진으로 학습된 최첨단 합성곱 신경망을 "reverse engineering”한 결과, 이러한 채널 중 상당수가 직접 해석할 수 있다는 사실을 발견했다.
예를 들어, 2014년 ImageNet 초대형 시각 인식 챌린지의 우승자인 InceptionV1이라고도 불리는 GoogLeNet에 이미지를 통과시키면 이미지를 바로 해석할 수 있다는 사실을 발견했다.
초기 레이어(왼쪽)의 채널은 "고주파 power” 또는 "45도 흑백 모서리”와 같은 단순한 개념의 맵 역할을 하고, 이후 레이어(오른쪽)의 채널은 “원”과 같은 점점 더 추상적인 개념의 피처 맵 역할을 하며, 결국에는 "늘어진 둥근 귀” 또는 “뾰족한 귀”와 같이 점점 더 복잡해진다.
Circuits Thread 블로그 게시물 시리즈에서 Open AI Clarity 팀은 가중치에 대한 면밀한 검토와 직접적인 실험을 결합하여 이러한 상위 수준의 기능이 GoogLeNet에서 어떻게 구성되는지에 대한 이해를 구축했다.
예를 들어, 처음 5개의 레이어에 있는 거의 모든 채널에 대해 합리적인 해석을 제공할 수 있다.
아래는 코드는 “가중치 탐색기”로, 기본적으로 이 탐색기는 conv2d1 레이어의 52번째 채널에서 시작하여 더 작은 위상에 민감한 필터로부터 큰 위상 불변 Gabor 필터를 구성한다.
이 채널은 커브 및 텍스처 감지기를 구성하는 데 사용되며, 이미지를 클릭하면 해당 채널의 가중치 탐색기 페이지로 이동하거나 layer 및 idx 인수를 변경할 수 있다.
입력에 대해 이 네트워크를 실행할 수는 있지만 학습 없이는 올바른 출력을 생성할 것으로 기대할 수 없다.
.forward 메서드를 검사해 nn.Modules가 어떻게 사용되는지 확인할 수 있다.
1989년 [LeNet](https://doi.org/10.1162%2Fneco.1989.1.4.541) 아키텍처나 2012년 [AlexNet](https://doi.org/10.1145%2F3065386) 아키텍처와 유사한 “downsampling”을 적용하는 “pooling” 레이어를 사용하여 컨볼루션에 이어 비선형성을 적용한다.
shape에 있어서의 문제를 피하기 가장 쉬운 방법은 padding과 stride과 같은 컨볼루션 파라미터를 선택하여 컨볼루션 전후의 모양을 동일하게 유지하는 것이다.
kernel_size=3, stride=1에 padding=1로 설정하면 모양을 동일하게 유지할 수 있다.
단위 보폭과 홀수 커널 크기에서 입력을 동일한 크기로 유지하는 패딩은 kernel_size // 2이다.
shape이 변하면 텐서가 차지하는 GPU 메모리의 양도 변한다.
블록 내에서 크기를 고정하면 한 축의 변화를 제거할 수 있다.
풀링 레이어를 적용한 후 커널 수를 적절한 비율로 늘리면 전체 텐서 크기와 메모리 사용량을 일정하게 유지할 수 있다.
Parameters, computation, and bottlenecks
각 레이어의 요소(element)의 수(number)를 검토하면 한 레이어에 다른 모든 레이어보다 훨씬 많은 항목(entries)이 있는 것을 알 수 있다.
[p.numel() for p in cnn.parameters()]  # conv weight + bias, conv weight + bias, fc weight + bias, fc weight + bias

# Output : [576, 64, 36864, 64, 1605632, 128, 10624, 83]
가장 큰 레이어는 일반적으로 컨볼루션 컴포넌트와 MLP 컴포넌트 사이에 있는 레이어이다.
biggest_layer = [p for p in cnn.parameters() if p.numel() == max(p.numel() for p in cnn.parameters())][0]
biggest_layer.shape, cnn.fc_input_dim

# Output : (torch.Size([128, 12544]), 12544)
이 계층은 네트워크를 디스크에 저장하는 데 드는 비용에 지배적이다.
따라서 DropOut(드롭아웃)과 같은 정규화 기법과 pruning(가지 치기)와 같은 성능 최적화의 일반적인 대상이 된다.
하지만, 해당 레이어에 매개변수가 가장 많다고 해서 대부분의 계산 시간이 해당 레이어에서 소비된다는 의미는 아니다.
컨볼루션은 동일한 파라미터를 반복해서 재사용하므로, 해당 레이어가 수행하는 총 FLOP 수는 파라미터가 더 많은 레이어가 수행하는 것보다 훨씬 더 높을 수 있다.
FLOP : 절대적인 연산량 (곱하기, 더하기 등)의 횟수
# for the Linear layers, number of multiplications per input == nparams
cnn.fc1.weight.numel()

# Output : 1605632
# for the Conv2D layers, it's more complicated

def approx_conv_multiplications(kernel_shape, input_size=(64, 28, 28)):  # this is a rough and dirty approximation
    num_kernel_elements = 1
    for dimension in kernel_shape[-3:]:
        num_kernel_elements *= dimension
    num_input_channels, num_kernels = input_size[0], kernel_shape[0]
    num_spatial_applications = ((input_size[1] - kernel_shape[-2] + 1) * (input_size[2] - kernel_shape[-1] + 1))
    mutliplications_per_kernel = num_spatial_applications * num_kernel_elements * num_input_channels
    return mutliplications_per_kernel * num_kernels
# ratio of multiplications in the convolution to multiplications in the fully-connected layer is huge!
approx_conv_multiplications(cnn.conv2.conv.weight.shape) // cnn.fc1.weight.numel()

# Output : 993
컴퓨팅 하드웨어와 문제 특성에 따라 MLP 구성 요소 또는 컨볼루션 구성 요소가 중요한 병목 현상이 될 수 있다.
모델을 브라우저로 '유선'으로 전송할 때와 같이 메모리에 제약이 있는 경우에는 MLP 구성 요소가 병목 현상이 발생할 가능성이 높지만,
low-power(저전력) edge device(엣지 디바이스)에서 모델을 실행하거나,
엄격한 low-latency(저지연) 요구 사항이 있는
애플리케이션에서 모델을 실행할 때와 같이 컴퓨팅에 제약이 있는 경우에는 컨볼루션 구성 요소가 병목 현상이 발생할 가능성이 높다.
Edge device : 데이터를 발생하는 기기로 데이터를 생성 또는 수집하는 사물 인터넷(IoT) 센서부터 비디오/감시 카메라, 인터넷에 연결된 가전 기기, 스마트폰과 같은 스마트 기기 등을 포함한다.
Training a CNN on EMNIST with the Lightning Trainer and run_experiment
“Lab 02a”에서 자세히 다룬 PyTorch Lightning을 사용하겠다.
이 리포지토리(training/run_experiment.py)에 있는 모델과 데이터셋을 사용하여 PyTorch Lightning으로 훈련하는 명령줄 인터페이스를 구현하는 간단한 스크립트를 제공한다.
pl.Trainer의 arguments가 우선이고 그 수가 많기 때문에, Model 또는 LitModel에 대해 구성 가능한 항목을 확인하려면 도움말 메시지의 마지막 수십 줄이 필요하다.
2023-06-23 04:02:50.347465: W tensorflow/compiler/tf2tensorrt/utils/py_utils.cc:38] TF-TRT Warning: Could not find TensorRT
                        .. deprecated:: v1.5 Trainer argument
                        ``terminate_on_nan`` was deprecated in v1.5 and will
                        be removed in 1.7. Please use ``detect_anomaly``
                        instead.

Data Args:
  --batch_size BATCH_SIZE
                        Number of examples to operate on per forward step.
                        Default is 128.
  --num_workers NUM_WORKERS
                        Number of additional processes to load data. Default
                        is 4.

Model Args:
  --conv_dim CONV_DIM
  --fc_dim FC_DIM
  --fc_dropout FC_DROPOUT

LitModel Args:
  --optimizer OPTIMIZER
                        optimizer class from torch.optim
  --lr LR
  --one_cycle_max_lr ONE_CYCLE_MAX_LR
  --one_cycle_total_steps ONE_CYCLE_TOTAL_STEPS
  --loss LOSS           loss function from torch.nn.functional
run_experiment.py 파일은 모듈로 가져올 수도 있으므로 노트북에서 내용을 검사하고 구성 함수를 사용해 볼 수 있다. (run_experiment.py 스크립트는 따로 설명하지 않겠다. 전체적인 로직을 파악하는 것에 초점을 맞추기 위함이다.)
Run an experiment.

    Sample command:
    ```
    python training/run_experiment.py --max_epochs=3 --gpus='0,' --num_workers=20 --model_class=MLP --data_class=MNIST
    ```

    For basic help documentation, run the command
    ```
    python training/run_experiment.py --help
    ```

    The available command line args differ depending on some of the arguments, including --model_class and --data_class.

    To see which command line args are available and read their documentation, provide values for those arguments
    before invoking --help, like so:
    ```
    python training/run_experiment.py --model_class=MLP --data_class=MNIST --help
이제 기본 인수를 사용하여 EMNIST에서 CNN에 대한 training 작업을 살펴보자.
gpus = int(torch.cuda.is_available())  # use GPUs if they're available

%run training/run_experiment.py --model_class CNN --data_class EMNIST --gpus {gpus}
WARNING:pytorch_lightning.loggers.tensorboard:Missing logger folder: training/logs/lightning_logs
INFO:pytorch_lightning.utilities.rank_zero:Trainer already configured with model summary callbacks: [<class 'pytorch_lightning.callbacks.model_summary.ModelSummary'>]. Skipping setting a default `ModelSummary` callback.
INFO:pytorch_lightning.utilities.rank_zero:GPU available: True, used: True
INFO:pytorch_lightning.utilities.rank_zero:TPU available: False, using: 0 TPU cores
INFO:pytorch_lightning.utilities.rank_zero:IPU available: False, using: 0 IPUs
INFO:pytorch_lightning.utilities.rank_zero:HPU available: False, using: 0 HPUs
INFO:pytorch_lightning.accelerators.gpu:LOCAL_RANK: 0 - CUDA_VISIBLE_DEVICES: [0]
INFO:pytorch_lightning.callbacks.model_summary:
| Name           | Type      | Params
---------------------------------------------
0 | model          | CNN       | 1.7 M
1 | model.conv1    | ConvBlock | 640
2 | model.conv2    | ConvBlock | 36.9 K
3 | model.dropout  | Dropout   | 0
4 | model.max_pool | MaxPool2d | 0
5 | model.fc1      | Linear    | 1.6 M
6 | model.fc2      | Linear    | 10.7 K
7 | train_acc      | Accuracy  | 0
8 | val_acc        | Accuracy  | 0
9 | test_acc       | Accuracy  | 0
---------------------------------------------
1.7 M     Trainable params
0         Non-trainable params
1.7 M     Total params
6.616     Total estimated model params size (MB)
Epoch 0: 100%
2542/2542 [00:31<00:00, 81.16it/s, loss=0.609, v_num=0, validation/loss=0.574, validation/acc=0.787]
INFO:pytorch_lightning.utilities.rank_zero:Best model saved at: /content/fsdl-text-recognizer-2022-labs/lab02/training/logs/lightning_logs/version_0/epoch=0000-validation.loss=0.574.ckpt
INFO:pytorch_lightning.utilities.rank_zero:Restoring states from the checkpoint path at /content/fsdl-text-recognizer-2022-labs/lab02/training/logs/lightning_logs/version_0/epoch=0000-validation.loss=0.574.ckpt
INFO:pytorch_lightning.accelerators.gpu:LOCAL_RANK: 0 - CUDA_VISIBLE_DEVICES: [0]
INFO:pytorch_lightning.utilities.rank_zero:Loaded model weights from checkpoint at /content/fsdl-text-recognizer-2022-labs/lab02/training/logs/lightning_logs/version_0/epoch=0000-validation.loss=0.574.ckpt
Testing DataLoader 0: 100%
┏━━━━━━━━━━━━━━━━━━━━━━━━━━━┳━━━━━━━━━━━━━━━━━━━━━━━━━━━┓
┃        Test metric        ┃       DataLoader 0        ┃
┡━━━━━━━━━━━━━━━━━━━━━━━━━━━╇━━━━━━━━━━━━━━━━━━━━━━━━━━━┩
│         test/acc          │    0.7834333777427673     │
│         test/loss         │    0.5791165828704834     │
└───────────────────────────┴───────────────────────────┘
가장 먼저 표시되는 것은 Lightning의 몇 가지 logger 메시지와 사용 가능한 하드웨어에 대한 몇 가지 정보이다.
그런 다음 모듈 이름, 매개변수 수, 모델 디스크 크기에 대한 정보를 포함한 모델 요약이 출력된다.
torchmetrics도 nn.Modules이므로 여기에 출력된다. (자세한 내용은 “Lab 02a”를 참조)
또한, training, validation 및 test 셋의 정확도를 추적하고 있다.
터미널에 "validation sanity check"를 언급하는 quick 메시지를 확인 할 수 있다.
PyTorch Lightning은 첫 번째 training 에포크 전에 모델에 몇 개의 validation 데이터 배치를 실행시킨다.
이는 validation 루프가 처음 트리거되는 첫 번째 에포크가 끝날 시점, training 실행이 중단되는 것을 방지할 수 있으며, 때로는 training 시작 시 빠르게 중단되어 training에 몇 시간이 걸리는 경우도 있다.
검사를 끄려면 --num_sanity_val_steps=0을 사용해야 한다.
그러면 처리량 및 loss와 같은 metric과 함께 training 에포크의 진행 상황을 나타내는 막대가 출력된다.
첫 번째(그리고 유일한) 에포크가 끝나면 validation 세트에서 모델이 실행되고 집계된 loss와 정확도가 콘솔에 출력된다.
training이 끝나면, Trainer.test를 호출하여 test 세트의 성능을 확인한다.
일반적으로 테스트 정확도는 75~80% 정도이다.
훈련 중에 PyTorch Lightning은 training을 다시 시작하는 데 사용할 수 있는 체크포인트(파일 확장자 .ckpt)를 저장한다.
run_experiment의 마지막 줄 출력은 validation 세트에서 가장 우수한 성능을 가진 모델이 저장된 위치를 나타낸다.
체크포인트 동작은 ModelCheckpoint 콜백을 사용하여 구성된다.
이러한 체크포인트에는 모델 가중치가 포함된다.
이를 사용하면 노트북에서 모델을 잃어버려도 실험을 해 볼 수 있다.
# we use a sequence of bash commands to get the latest checkpoint's filename
#  by hand, you can just copy and paste it

list_all_log_files = "find training/logs/lightning_logs"  # find avoids issues with \n in filenames
filter_to_ckpts = "grep \.ckpt$"  # regex match on end of line
sort_version_descending = "sort -Vr"  # uses "version" sorting (-V) and reverses (-r)
take_first = "head -n 1"  # the first n elements, n=1

latest_ckpt, = ! {list_all_log_files} | {filter_to_ckpts} | {sort_version_descending} | {take_first}
latest_ckpt
모델을 다시 빌드하려면 run_experiment 스크립트의 몇 가지 구현 세부 사항을 고려해야 한다.
파싱된 args를 사용하여 데이터와 모델을 빌드한 다음, 이 세 가지(체크포인트, 인수, 모델)를 모두 사용하여 LightningModule을 빌드한다.
load_from_checkpoint 메서드를 사용하여 체크포인트에서 모든 LightningModule을 다시 인스턴스화할 수 있지만, 모델을 다시 로드하려면 인수를 다시 생성하고 전달해야 한다.
이 과정을 자동화 하는 것을 나중에 살펴볼 것이다.
import training.util
from argparse import Namespace

# if you change around model/data args in the command above, add them here
#  tip: define the arguments as variables, like we've done for gpus
#       and then add those variables to this dict so you don't need to
#       remember to update/copy+paste

args = Namespace(**{
    "model_class": "CNN",
    "data_class": "EMNIST"})

_, cnn = training.util.setup_data_and_model_from_args(args)

reloaded_model = text_recognizer.lit_models.BaseLitModel.load_from_checkpoint(
   latest_ckpt, args=args, model=cnn)
모델이 다시 로드되면 몇 가지 샘플 데이터에서 모델을 실행하고 그 결과를 확인할 수 있다.
이제 체크포인트에서 유망한 학습을 계속할 수 있다.
아래 코드를 실행하면, 학습한 모델을 다른 에포크에 대해 학습한다.
training loss가 이전 실행에서 끝났던 지점 근처에서 시작된다는 점에 유의해야 한다.
latest_ckpt, = ! {list_all_log_files} | {filter_to_ckpts} | {sort_version_descending} | {take_first}

# and we can change the training hyperparameters, like batch size
%run training/run_experiment.py --model_class CNN --data_class EMNIST --gpus {gpus} \
  --batch_size 64 --load_checkpoint {latest_ckpt}
INFO:pytorch_lightning.utilities.rank_zero:Trainer already configured with model summary callbacks: [<class 'pytorch_lightning.callbacks.model_summary.ModelSummary'>]. Skipping setting a default `ModelSummary` callback.
INFO:pytorch_lightning.utilities.rank_zero:GPU available: True, used: True
INFO:pytorch_lightning.utilities.rank_zero:TPU available: False, using: 0 TPU cores
INFO:pytorch_lightning.utilities.rank_zero:IPU available: False, using: 0 IPUs
INFO:pytorch_lightning.utilities.rank_zero:HPU available: False, using: 0 HPUs
INFO:pytorch_lightning.accelerators.gpu:LOCAL_RANK: 0 - CUDA_VISIBLE_DEVICES: [0]
INFO:pytorch_lightning.callbacks.model_summary:
  | Name           | Type      | Params
---------------------------------------------
0 | model          | CNN       | 1.7 M
1 | model.conv1    | ConvBlock | 640
2 | model.conv2    | ConvBlock | 36.9 K
3 | model.dropout  | Dropout   | 0
4 | model.max_pool | MaxPool2d | 0
5 | model.fc1      | Linear    | 1.6 M
6 | model.fc2      | Linear    | 10.7 K
7 | train_acc      | Accuracy  | 0
8 | val_acc        | Accuracy  | 0
9 | test_acc       | Accuracy  | 0
---------------------------------------------
1.7 M     Trainable params
0         Non-trainable params
1.7 M     Total params
6.616     Total estimated model params size (MB)
Epoch 0: 100%
5083/5083 [00:46<00:00, 108.95it/s, loss=0.575, v_num=1, validation/loss=0.540, validation/acc=0.794]
INFO:pytorch_lightning.utilities.rank_zero:Best model saved at: /content/fsdl-text-recognizer-2022-labs/lab02/training/logs/lightning_logs/version_1/epoch=0000-validation.loss=0.540.ckpt
INFO:pytorch_lightning.utilities.rank_zero:Restoring states from the checkpoint path at /content/fsdl-text-recognizer-2022-labs/lab02/training/logs/lightning_logs/version_1/epoch=0000-validation.loss=0.540.ckpt
INFO:pytorch_lightning.accelerators.gpu:LOCAL_RANK: 0 - CUDA_VISIBLE_DEVICES: [0]
INFO:pytorch_lightning.utilities.rank_zero:Loaded model weights from checkpoint at /content/fsdl-text-recognizer-2022-labs/lab02/training/logs/lightning_logs/version_1/epoch=0000-validation.loss=0.540.ckpt
Testing DataLoader 0: 100%
844/844 [00:05<00:00, 152.79it/s]
┏━━━━━━━━━━━━━━━━━━━━━━━━━━━┳━━━━━━━━━━━━━━━━━━━━━━━━━━━┓
┃        Test metric        ┃       DataLoader 0        ┃
┡━━━━━━━━━━━━━━━━━━━━━━━━━━━╇━━━━━━━━━━━━━━━━━━━━━━━━━━━┩
│         test/acc          │    0.7914906740188599     │
│         test/loss         │    0.5436267256736755     │
└───────────────────────────┴───────────────────────────┘
Creating lines of text from handwritten characters: EMNISTLines
이제까지의 과정을 요약해보면, 모델과 데이터에 대한 학습 파이프라인이 있고, 이를 사용하여 loss를 줄이고 작업을 수행한다.
하지만 우리가 해결하고 있는 문제는 중앙에 위치한 고대비의, 고립된 문자를 처리하는 방법을 학습하는 것뿐이다.
텍스트 인식 애플리케이션에서 이 기능을 사용하려면 먼저 이미지에서 이와 같은 문자를 추출하는 요소가 필요하다.
이 작업은 이제까지의 과정보다 더 어렵고 게다가 두 개의 개별 요소로 분리하는 것은 “end-to-end”로 작동하는 딥러닝의 정신에 어긋난다.
여러 문자에서 텍스트 라인들을 만들어 모델을 위한 데이터를 합성함으로써 사실감을 부여한다.
합성 데이터는 일반적으로 제한된 실제 데이터를 보강하는 데 유용하다.
우리가 데이터를 생성했기 때문에 구성별로 레이블도 알고 있는 상황이다.
가짜 손글씨를 만들기 위해 실제 손글씨와 실제 텍스트라는 두 가지를 결합한다.
[natural language tool kit](https://www.nltk.org/) 라이브러리에서 제공하는 브라운 말뭉치(Brown Corpus)에서 가짜 텍스트를 생성한다.
먼저 해당 말뭉치를 다운로드한다.
from text_recognizer.data.sentence_generator import SentenceGenerator

sentence_generator = SentenceGenerator()

SentenceGenerator.__doc__
[nltk_data] Downloading package brown to /content/fsdl-text-
[nltk_data]     recognizer-2022-labs/data/downloaded/nltk...
[nltk_data]   Unzipping corpora/brown.zip.
Generate text sentences using the Brown corpus.
SentenceGenerator를 사용하여 말뭉치에서 짧은 텍스트 snippet을 생성할 수 있다.
print(*[sentence_generator.generate(max_length=16) for _ in range(4)], sep="\n")

# Output :

# phase
# Within
# either
# the
다른 DataModule을 사용하여 EMNIST에서 필요한 손글씨 문자를 골라내어 생성된 텍스트가 포함된 이미지에 붙인다.
EMNIST Lines dataset: synthetic handwriting lines dataset made from EMNIST characters.
emnist_lines.prepare_data()  # download, save to disk
emnist_lines.setup()  # create torch.utils.data.Datasets, do train/val split
emnist_lines
EMNISTLinesDataset generating data for train...
EMNISTLinesDataset generating data for val...
EMNISTLinesDataset generating data for test...
EMNISTLinesDataset loading data from HDF5...
EMNIST Lines Dataset
Min overlap: 0
Max overlap: 0.33
Num classes: 83
Dims: (1, 28, 896)
Output dims: (32, 1)
Train/val/test sizes: 10000, 2000, 2000
Batch x stats: (torch.Size([128, 1, 28, 896]), torch.float32, 0.0, 0.07364349067211151, 0.23208004236221313, 1.0)
Batch y stats: (torch.Size([128, 32]), torch.int64, 3, 66)
데이터 준비(Data Preparation)를 구성하기 위해 LightningDataModule 인터페이스를 사용하고 있으므로 이제 배치를 가져와서 일부 데이터를 살펴볼 수 있다.
nn.Modules는 거의 동일하게 보이지만 사용되는 방식이 다르며, .forward 메서드를 살펴보면 이를 알 수 있다.
def forward(self, x: torch.Tensor) -> torch.Tensor:
        """Apply the LineCNN to an input image and return logits.

        Parameters
        ----------
        x
            (B, C, H, W) input image with H equal to IMAGE_SIZE

        Returns
        -------
        torch.Tensor
            (B, C, S) logits, where S is the length of the sequence and C is the number of classes
            S can be computed from W and CHAR_WIDTH
            C is self.num_classes
        """
        B, _C, H, W = x.shape
        assert H == IMAGE_SIZE  # Make sure we can use our CNN class

        # Compute number of windows
        S = math.floor((W - self.WW) / self.WS + 1)

        # NOTE: type_as properly sets device
        activations = torch.zeros((B, self.num_classes, S)).type_as(x)
        for s in range(S):
            start_w = self.WS * s
            end_w = start_w + self.WW
            window = x[:, :, :, start_w:end_w]  # -> (B, C, H, self.WW)
            activations[:, :, s] = self.cnn(window)

        if self.limit_output_length:
            # S might not match ground truth, so let's only take enough activations as are expected
            activations = activations[:, :, : self.output_length]
        return activations
정사각형 이미지에서 작동하는 CNN을 우리의 기다란 이미지에 반복적으로 적용하고, 매번 창 크기(window size)만큼 슬라이드한다.
INFO:pytorch_lightning.utilities.rank_zero:Trainer already configured with model summary callbacks: [<class 'pytorch_lightning.callbacks.model_summary.ModelSummary'>]. Skipping setting a default `ModelSummary` callback.
INFO:pytorch_lightning.utilities.rank_zero:GPU available: True, used: True
INFO:pytorch_lightning.utilities.rank_zero:TPU available: False, using: 0 TPU cores
INFO:pytorch_lightning.utilities.rank_zero:IPU available: False, using: 0 IPUs
INFO:pytorch_lightning.utilities.rank_zero:HPU available: False, using: 0 HPUs
EMNISTLinesDataset loading data from HDF5...
INFO:pytorch_lightning.accelerators.gpu:LOCAL_RANK: 0 - CUDA_VISIBLE_DEVICES: [0]
INFO:pytorch_lightning.callbacks.model_summary:
  | Name      | Type          | Params
--------------------------------------------
0 | model     | LineCNNSimple | 1.7 M
1 | model.cnn | CNN           | 1.7 M
2 | train_acc | Accuracy      | 0
3 | val_acc   | Accuracy      | 0
4 | test_acc  | Accuracy      | 0
--------------------------------------------
1.7 M     Trainable params
0         Non-trainable params
1.7 M     Total params
6.616     Total estimated model params size (MB)
Epoch 1: 100%
376/376 [00:26<00:00, 13.95it/s, loss=1.45, v_num=2, validation/loss=1.380, validation/acc=0.689]
INFO:pytorch_lightning.utilities.rank_zero:Best model saved at: /content/fsdl-text-recognizer-2022-labs/lab02/training/logs/lightning_logs/version_2/epoch=0001-validation.loss=1.376.ckpt
INFO:pytorch_lightning.utilities.rank_zero:Restoring states from the checkpoint path at /content/fsdl-text-recognizer-2022-labs/lab02/training/logs/lightning_logs/version_2/epoch=0001-validation.loss=1.376.ckpt
INFO:pytorch_lightning.accelerators.gpu:LOCAL_RANK: 0 - CUDA_VISIBLE_DEVICES: [0]
INFO:pytorch_lightning.utilities.rank_zero:Loaded model weights from checkpoint at /content/fsdl-text-recognizer-2022-labs/lab02/training/logs/lightning_logs/version_2/epoch=0001-validation.loss=1.376.ckpt
EMNISTLinesDataset loading data from HDF5...
Testing DataLoader 0: 100%
63/63 [00:01<00:00, 34.43it/s]
┏━━━━━━━━━━━━━━━━━━━━━━━━━━━┳━━━━━━━━━━━━━━━━━━━━━━━━━━━┓
┃        Test metric        ┃       DataLoader 0        ┃
┡━━━━━━━━━━━━━━━━━━━━━━━━━━━╇━━━━━━━━━━━━━━━━━━━━━━━━━━━┩
│         test/acc          │    0.6743437647819519     │
│         test/loss         │    1.4315539598464966     │
└───────────────────────────┴───────────────────────────┘
65~70% 범위의 테스트 정확도를 확인할 수 있다.
# if you change around model/data args in the command above, add them here
#  tip: define the arguments as variables, like we've done for gpus
#       and then add those variables to this dict so you don't need to
#       remember to update/copy+paste

args = Namespace(**{
    "model_class": "LineCNNSimple",
    "data_class": "EMNISTLines"})

_, line_cnn = training.util.setup_data_and_model_from_args(args)

latest_ckpt, = ! {list_all_log_files} | {filter_to_ckpts} | {sort_version_descending} | {take_first}
print(latest_ckpt)

reloaded_lines_model = text_recognizer.lit_models.BaseLitModel.load_from_checkpoint(
   latest_ckpt, args=args, model=line_cnn)

# Output : training/logs/lightning_logs/version_2/epoch=0001-validation.loss=1.376.ckpt